¶ INTRODUCTION
TeamSpeak 2 is the unique bidirectional audio communication software allowed in the IVAO Network.
TeamSpeak 2 simulates an aircraft or ATC radio transceiver.
TeamSpeak 3 is not compatible with current network and audio architecture. Do not use TeamSpeak 3 !
This document outlines TeamSpeak 2 procedures.
¶ USE IN IVAO
This Software can be used:
- As a pilot to speak with ATC when flying online
- As an ATC to speak with pilots flying in your airspace
- As an observer to listen to ATC and pilots in an ATC channel
- As a trainer or examiner to conduct training and examination
- As a staff member to communicate with all the members (staff or regular member)
- As a pilot to speak with your Virtual airline pilots

¶ EQUIPMENT NEED

When using TeamSpeak, you need some basic equipment along with your computer:
- Headset equipped with microphone (using USB or Audio connectors)
- Headset with separate microphone
- Speaker with separate microphone
IVAO procedures recommend the use of a basic headset with an integrated microphone in order to keep hands free for flying or controlling.
¶ DONWLOAD
The last version of IVAO pilot interface and IVAO ATC software no longer requires external install of TS2. Aurora and Altitude come with a built-in voice system.
For IvAc and IvAp users, the installer will automatically install TeamSpeak 2. Use this method as regular installation of IVAO software.
For people who have any problems with TeamSpeak 2 installation, you can download TeamSpeak 2 software for free using the link from the IVAO website.
¶ CONNECTION TO A SERVER
¶ IVAO SERVER LIST
The table presented will show you some of the possible network server names.
| Server name | Server address name |
|---|---|
| Europe no 2 | Eu2.ts.ivao.aero |
| Europe no 6 | Eu6.ts.ivao.aero |
| Europe no16 | Eu16.ts.ivao.aero |
| Europe no17 | Eu17.ts.ivao.aero |
| Community Channel | cc.ts.ivao.aero |
Be aware that this list can change when some servers open or others close.
The list can be found on : http://ts.ivao.aero
The community channel server (cc.ts) is the server that you must use when you want to chat with other members when not making use of ATC services (example: private chat, virtual airline specific channel to meet friends, staff meeting, and examination meeting …).
¶ CONNECT TO A SERVER MANUALLY
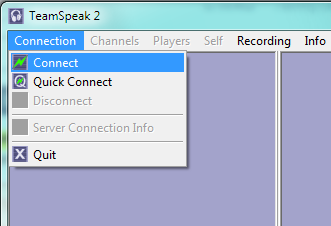
In order to connect a server manually:
- Open TeamSpeak 2
- Select Connection tab
- Click on “Connect”
Then a separate window named “connect to server” opens.
- If you have some servers already programmed, double click on the chosen server to connect it.
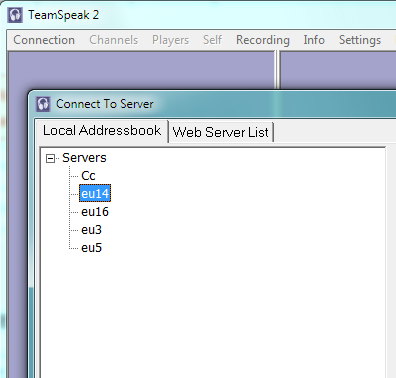
If the server list is empty, please follow the server adding procedure
¶ SERVER ADDING PROCEDURE=
In order to add a server manually to the list, follow the procedure for each server:
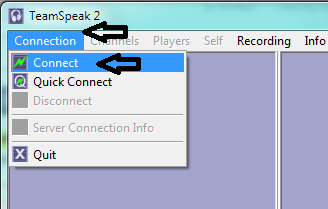
- Open TeamSpeak 2
- Left-click Connection tab
- Left-click “Connect”
Then a separate window named “connect to server” opens.
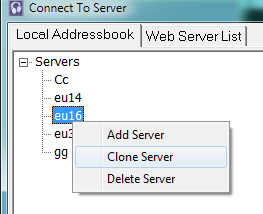
- Right-click on “Servers” as in the image
- Left-click on “Add Server”
A new server name “New Server” is created in the list, then:
- Left-click on “New Server” in order to edit and assign an appropriate name.
- Complete the field as in the example below (EU1 server)
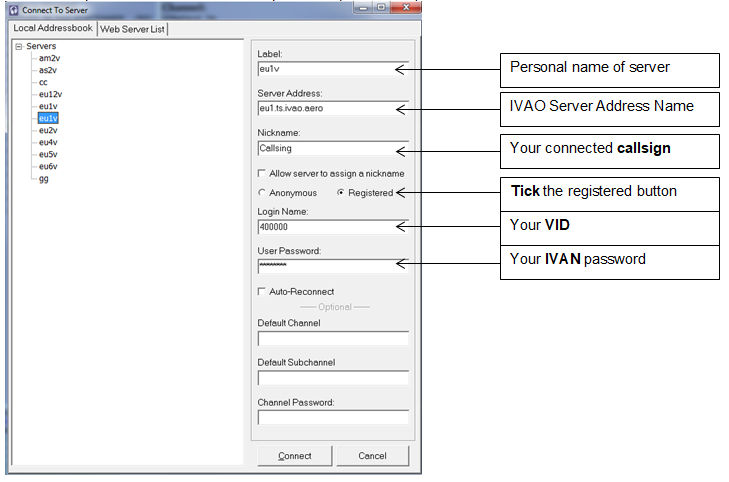
After completing all the fields, click on the “Connect” button to test your new server.
¶ SERVER CLONING PROCEDURE
After your first server is set, you can clone this server in order to duplicate servers and assign new names and servers.
After duplicating your server, just edit and modify the Label name and the server Name in order to set up a new server.
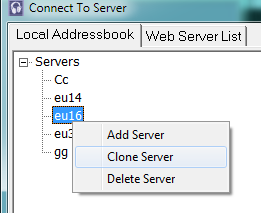
This procedure is the easiest to program another server without typing your VID and Password. Of course, if you made too many duplicate servers, you can delete some using the Delete server command.
¶ TEAMSPEAK 2 BASIC CONFIGURATION
¶ PUSH TO TALK SET-UP
In order to avoid unknown noises on a frequency, you must use the push-to-talk (PTT) setup and configure an associated key to use for radio transmission.
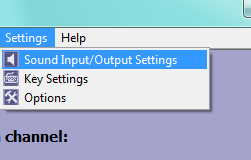
In order to configure your PTT key:
- Open TeamSpeak 2
- Select Setting tab
- Click on “Sound Input/Output Settings”
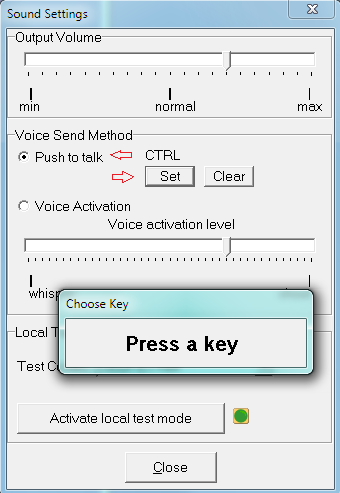
A new sub window “Sound Settings” opens:
- Select “Push to talk” radio button
- Left-click on the “Set” button in order to define the transmission key (utilize an unused key on your keyboard).
This key you have defined must be pressed before you speak and must be released after you have finished speaking. Pay careful attention not to release the key as you speak the last word, but after the last word.
It is very important to select an unused key (key like CTRL, SHIFT, ALT, ALTGR)
Our advice is not to use the ‘voice activation’ feature in TS on IVAO due to external sounds which could automatically activate transmission.
In the real world, there is no voice activation when flying!
¶ REMOVE ALL AUTOMATIC SOUND NOTIFICATIONS
In order not to be disturbed by automatic sound notifications, we advise you to suppress them all.
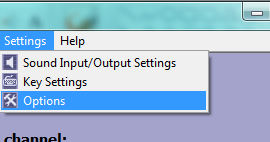
In order to disable sound notifications:
- Open TeamSpeak 2
- Select Setting tab
- Click on “Options”
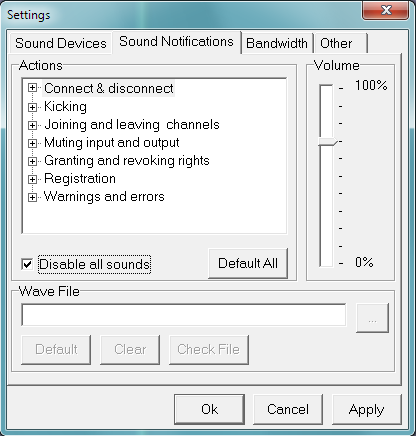
A new sub-window “Settings” opens:
- Select “Sound Notifications” tab
- Check the “Disable all sounds” box
For advanced users, with this tab, you can select the notifications you wish to program, suppress or modify.
For beginners, we advise you to disable all sounds.
¶ SERVER INTERNAL STRUCTURE PRESENTATION
Each server has several channels where ATCs and pilots communicate. When connecting manually to a server, you are automatically placed in a channel called “Unicom”.
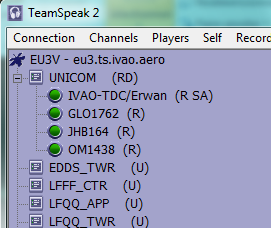
This “Unicom” channel is a standby channel. No radio communication shall be done in this default channel. This is not a voice self-information channel.
Except in the “Community Server” channel, each open channel is opened by an active ATC.
Below, you will find the connection on the community server.
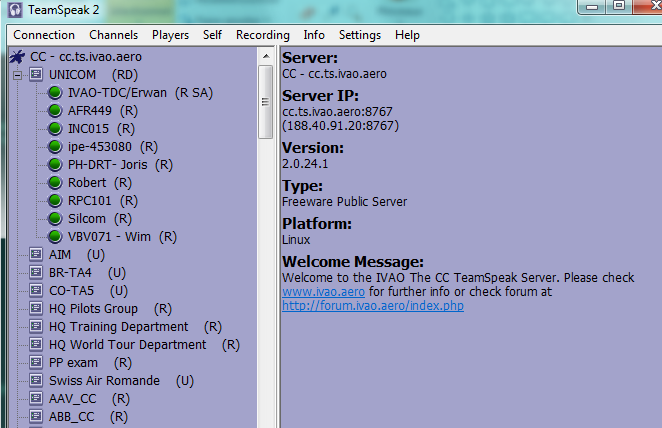
In the community channel server, sometimes channel access may be restricted for private examinations, training, staff meetings, and virtual airline meetings use. Please consult the channel description on the left before entering.
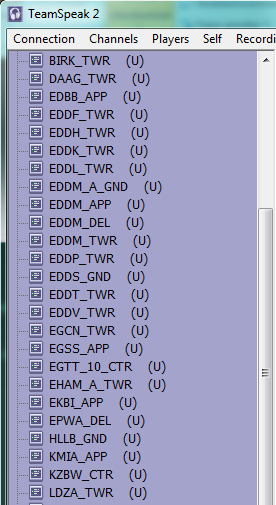
Each channel shall have the connection name of the active ATC inside
This name is made up of the ICAO code of the airport or controlled zone, followed by the position trigram (DEL, GND, TWR, DEP, APP, CTR, FSS).
¶ USE OF TEAMSPEAK AS AN AIR TRAFFIC CONTROLLER (ATC)
When connecting to IvAc, you must select the Voice option in order to activate voice communication for the ATC service you are going to provide.
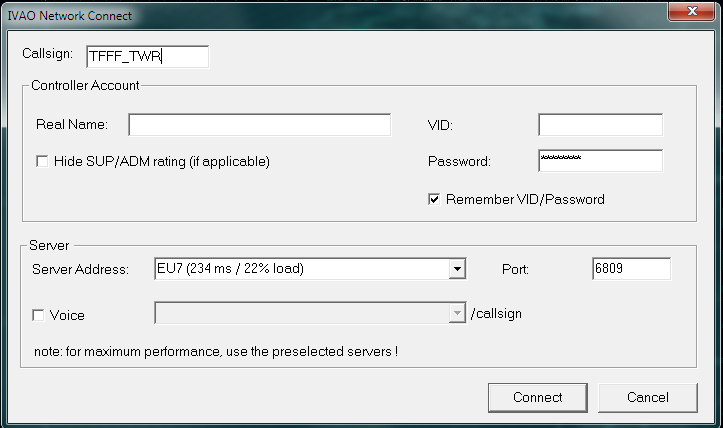
IVAO policy recommends to all the use of voice communications due to the increased sense of realism (we try to be as real as it gets).
¶ CONNECTION
After IVAO ATC software has connected, TeamSpeak is automatically launched on the selected server.
Be aware that IvAc and TeamSpeak cannot automatically create your ATC channel. You must create it.
¶ CHANNEL CREATION
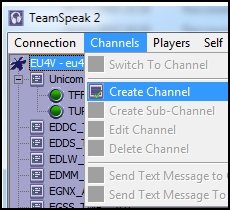
Select “Channels” menu and left-click on “Create Channel”
Then, a sub-window “Create New Channel” opens.
In that window, type the name of your position which is the same as your IVAO ATC software call sign.
Then left-click “create channel” in order to create it on the server
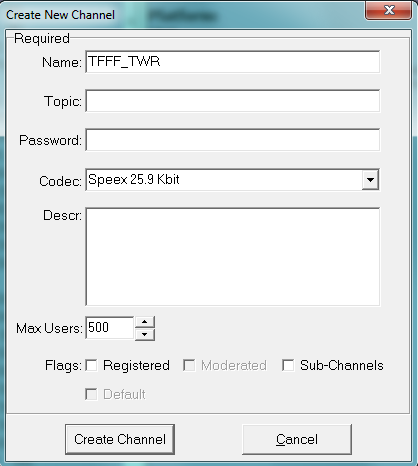
The use of the same IvAc call sign, as used for the ATC position you will be manning, for the TeamSpeak channel is mandatory. If these names are not the same, pilots would not be able to automatically connect to your voice channel on the server.
After channel creation, you will find yourself located in the new channel with channel rights (CA) given automatically.
Now you can start to control using voice.
Be aware that if you change your call sign on IvAc after a network disconnection and controlling the same position, you must rename your channel according to the new call sign.
If you change your position in IvAc you must close the position and advise the pilots that you are leaving this position. Then you can rename with [closed] comment in the channel name and leave this channel in order to create the new position channel.
¶ USE OF TEAMSPEAK AS A PILOT
¶ TRANSMISSION MODE SELECTION IN IVAO PILOT INTERFACE
When you want to use voice communications as a pilot (highly recommended), you must select the Transmit/Receive option in IVAO pilot interface.
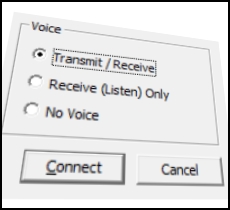
IVAO policy recommends to all the use of voice communications due to the heightened sense of realism (try to be as real as it gets).
Some pilots can receive audio communications only and for some reason, they may not be able to speak (ex: baby asleep). In this case, it is highly recommended to select ”Receive (listen) Only” in spite of No voice. As a pilot you must know that text communication slows down the ATC efficiency.
The “No voice” mode is the historical text mode. This mode can be used for a pilot who cannot speak (handicap) or they cannot understand spoken English. Of course, when using this mode, you must be able to communicate using basic written English.
When using text mode, the “read back” procedure is also mandatory.
¶ AUTOMATIC SWITCHING WITH IVAO PILOT INTERFACE
When you select an ATC in order to contact with him on IVAO pilot interface, IVAO pilot interface sends the connection command to TeamSpeak 2 using Air Traffic Controller server parameters stored in his ATIS.
Your call sign will automatically be taken from IVAO pilot interface and TeamSpeak will put you directly on the correct server and channel (if the ATC has correctly programmed his ATIS and TeamSpeak channel).
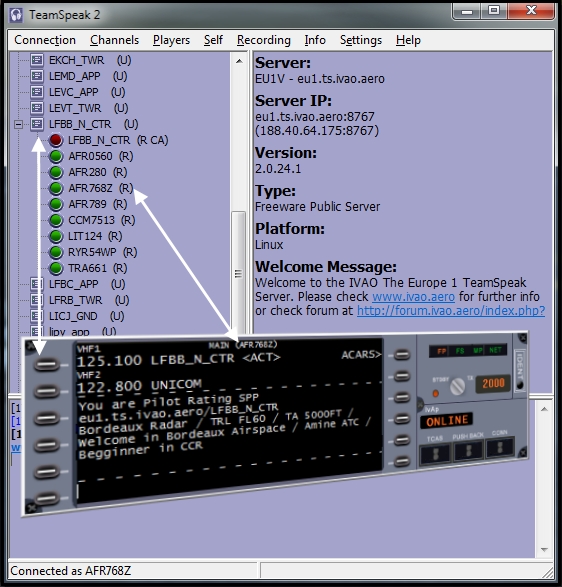
After listening to the channel activity for a short period, you may contact the ATC when no one else is communicating.
As there are often many pilots on an ATC frequency, please be patient and listen to ATC, other pilots and always speak after the read-back from any pilot. Be respectful.
¶ SEE ALSO
- None
¶ REFERENCE
- None
¶ AUTHOR
- VID 150259 - Creation
- VID 256272 - Wiki Integration
- VID 346148 - Wiki Migration
- VID 573229 - Updates
¶ COPYRIGHT
- This documentation is copyrighted as part of the intellectual property of the International Virtual Aviation Organisation.
¶ DISCLAIMER
- The content of this documentation is intended for aviation simulation only and must not be used for real aviation operations.