¶ INTRODUCTION
The Automatic Unicom feature is a specific interface to ease the auto information or self announcing procedure
on UNICOM, procedure also known as Traffic Information Broadcast by Aircraft (TIBA)
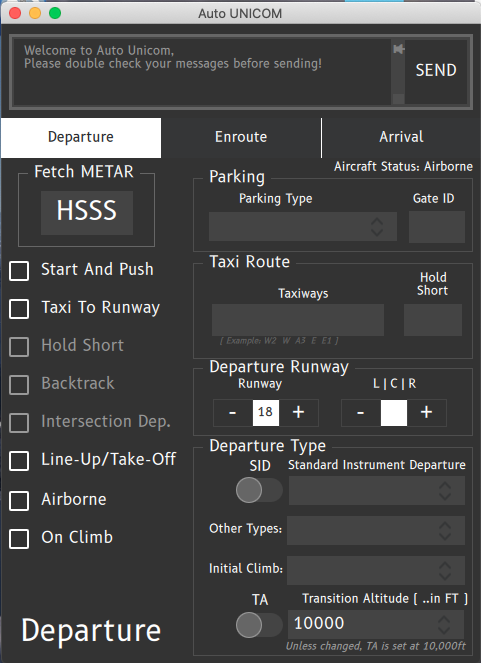
¶ MAIN AUTO UNICOM WINDOW
You will find below the main Auto Unicom window.
The main areas of the Auto Unicom are:
- on top, the constructed phraseology message to be sent on frequency through the SEND button.
- on the middle, the selection bar of the different main phases of flight (Departure, Enroute, Arrival)
- on the bottom right, the METAR request from the departure or arrival airfield taken from the flight plan
- in the left part, the selection of the sentence to send
- in the middle, the different variable fields to select or to fill covering different areas like
- Parking (pushback)
- Taxi route (holding point)
- Runway selection (for taking off or landing)
- Departure
- Navigation (cruise)
- Arrival
- VFR operation
Note that if there is some field mandatory to be filled, the Auto Unicom application will highlight the area by red outlined rectangles like the image below:
¶ DIFFERENT PHASES OF FLIGHT DESCRIPTION
¶ DEPARTURE
¶ METAR REQUEST
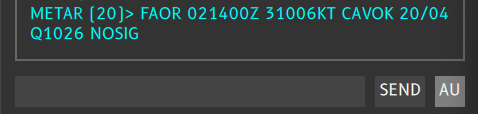
To request the METAR of the departure airport of your flightplan, click on the OACI (on the example: FAOR).
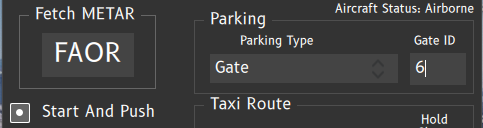
METAR will be sent to your Altitude message list.
¶ START AND PUSH
The Start and Push phase of flight is working through the Parking Area.
- Select the parking type (optional)
- Enter the gate or position number (optional)
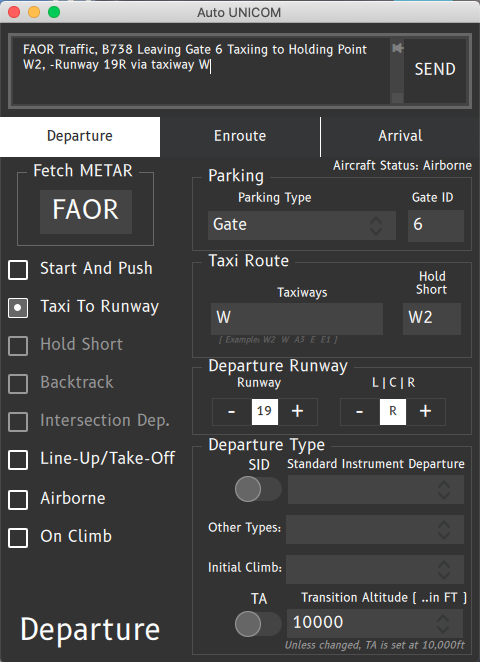
¶ TAXI TO RUNWAY
The Taxi To Runway phase of flight is working through the Taxi Route and Runway Area.
- Enter the taxiways involved for the Taxi route and holding point (Optional)
- Select the runway in service (Mandatory)
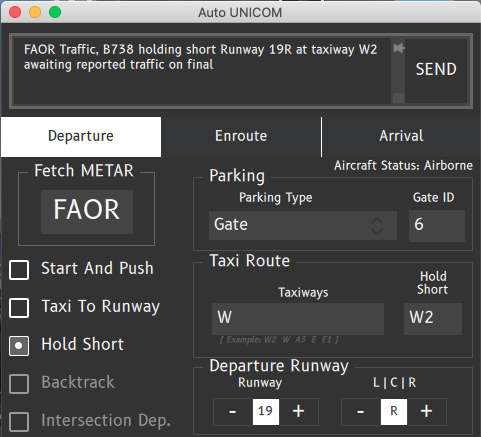
There are 2 other optional options for taxi operation which may occur in the flight:
- Hold sort runway when traffic is landing or taking-off. You shall delay your take-off.
- Backtrack runway when no taxiway is available for your take-off, respecting the take-off distance from your current taxiway. You shall backtrack the runway.
When the Hold short option is selected:
When the Back Track option is selected:

Note that the Back Track and Hold Short options will use the same element as the Taxi to Runway phase of flight.
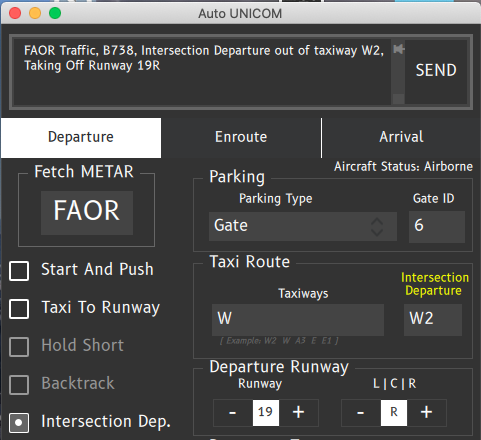
¶ LINE-UP/TAKE-OFF
The Line-up/Take-off phase of flight is working through the Runway Area.
- Select the runway in service (mandatory)

There is an option for intersection departure when an other aircraft is waiting on an other holding point:
- Enter the Holding Point in the taxi route area (mandatory)
- Tick the Intersection Departure
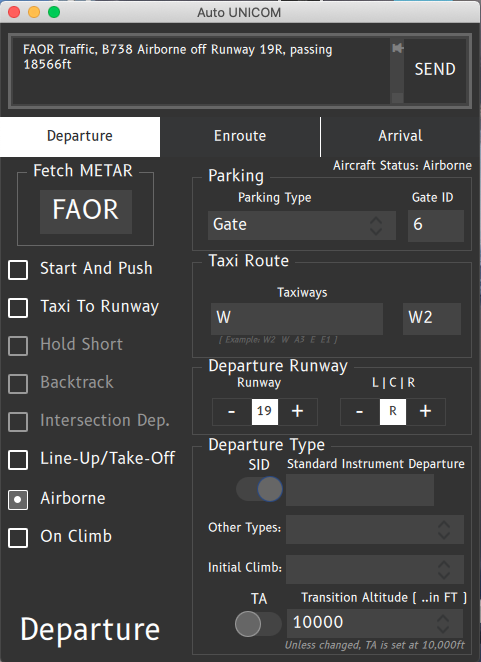
¶ AIRBORNE
The Airborne phase of flight is working through the Runway Area.
- Select the runway in service (Mandatory)
- The application will take your crossing altitude from the simulator.
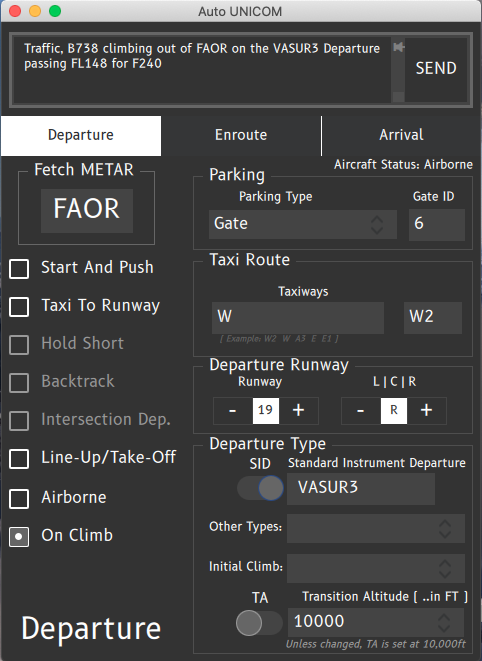
¶ ON CLIMB
The On Climb phase of flight is working through the Departure Area.
- Enter your chosen SID identifier (optional)
- In case of omnidirectional departure you can select the first FIX or NAVAID from your flight plan (optional)
- For specific cases or for VFR flights, you can select other types of departure (optional)
- For announcing your initial altitude, you can select one of the proposed altitudes (optional)
- The application will take your crossing altitude from the simulator.
If you let the SID check box to the left, the dropdown menu will allow you to select SID from your FPL. If you move it to the right, you need to manually type your SID in the box.
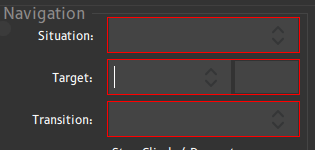
¶ ENROUTE
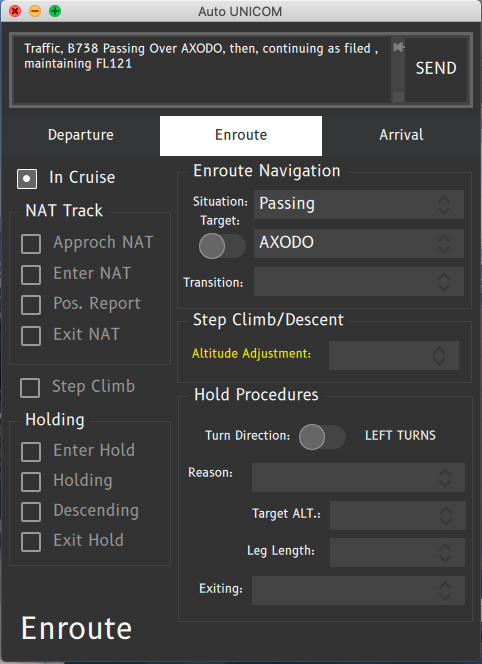
¶ IN CRUISE
The In Cruise phase of flight is working through the Navigation Area.
- Select the Situation related to your current flight (mandatory)
- Select the Target element from your flight plan related to the situation (optional)
- Select the Transition from the predefined list related to your situation (optional)
¶ NAT TRACK
The NAT Track phase of flight is working through the North Atlantic Track Area. See http://occ.ivao.aero
- Select the NAT you are currently flying or random routing (mandatory)
- Select the point you report to pass, time, the flight level and Mach number (optional for approach, mandatory for others)
- Select the next point and time you estime it (optional for approach, mandatory for others)
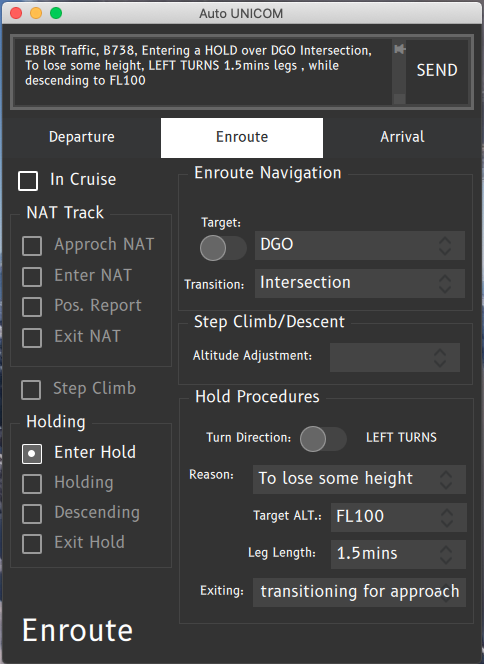
¶ HOLDING
The Hold is a procedure used when there is a delay in approach.
- You can report Entering, Holding, Descending and Exiting Hold from the Auto Unicom window.
¶ ARRIVAL
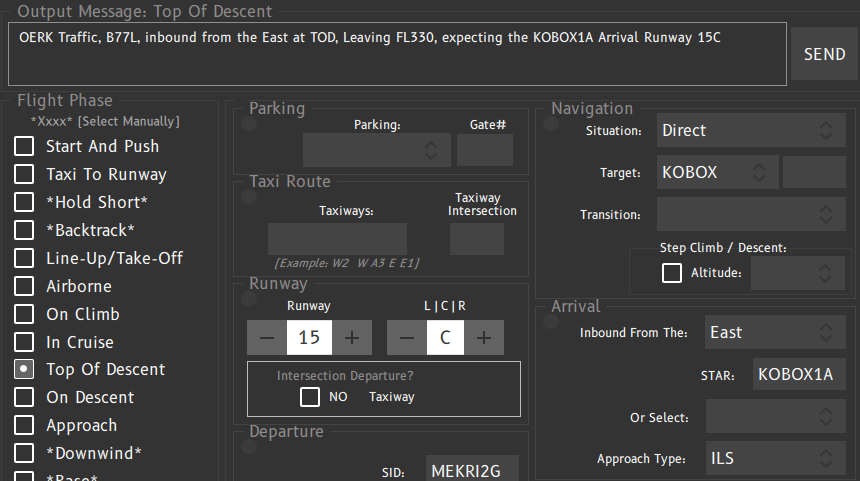
¶ TOP OF DESCENT
The Top of Descent phase of flight is working through the Runway and Arrival Area.
- Select the runway in use for landing (mandatory)
- Select the geographical area where you will be arriving; especially useful for VFR (optional)
- Enter the chosen STAR (optional)
- In case of omnidirectional arrival, enter the arrival reference point or IAF (optional)
¶ ON DESCENT
The On Descent phase of flight is working through the Runway, Navigation and Arrival Area
- Select the runway in use for landing (Mandatory)
- Select the geographical area where you will be arriving; especially useful for VFR (optional)
- Enter the chosen STAR (optional)
- In case of omnidirectional arrival, enter the arrival reference point or IAF (optional)
- Select the approach type (optional)
- The application will take your crossing altitude from the simulator
- Select the Situation related to your current flight for specific navigation (mandatory)
- Select the Target element from your flight plan related to the situation (optional)
- Select the Transition from the predefined list related to your situation (optional)

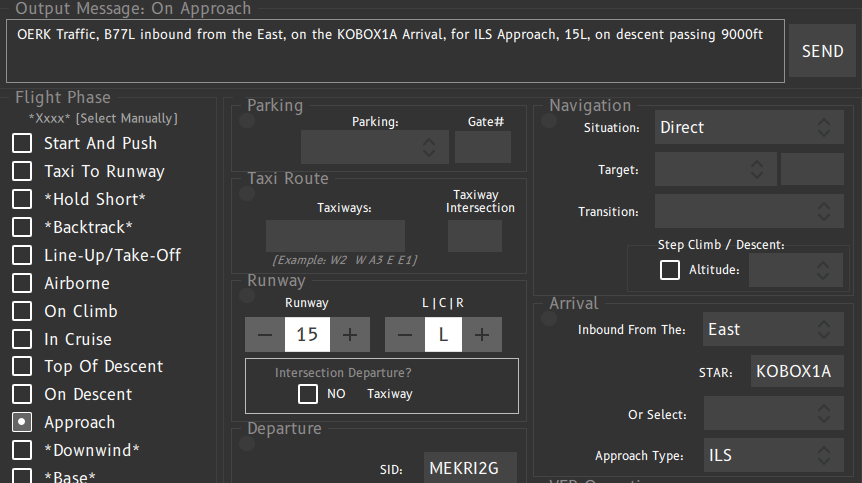
¶ APPROACH
The Approach phase of flight is working through the Runway, Navigation and Arrival Area.
- Select the runway in use for landing (mandatory)
- Select the geographical area where you will be arriving; especially useful for VFR (optional)
- Enter the chosen STAR (optional)
- In case of omnidirectional arrival, enter the arrival reference point or IAF (optional)
- Select the approach type (optional)
- Select the Situation related to your current flight for specific navigation (mandatory)
- Select the Target element from your flight plan related to the situation (optional)
- Select the Transition from the predefined list related to your situation (optional)
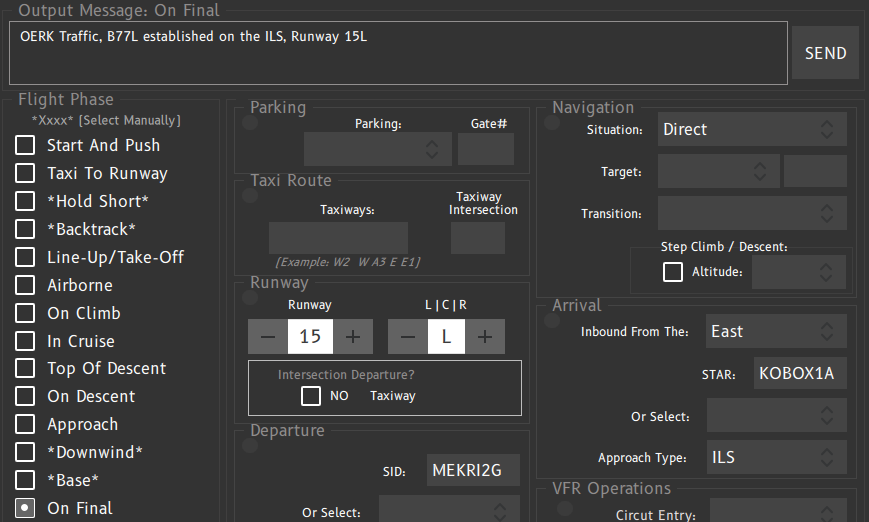
¶ ON FINAL
The On Final phase of flight is working through the Runway Area.
- Select the runway in use for landing (mandatory)
¶ RUNWAY VACATED
The Runway Vacated phase of flight is working through the Runway Area.
- Select the runway in use for landing (mandatory)
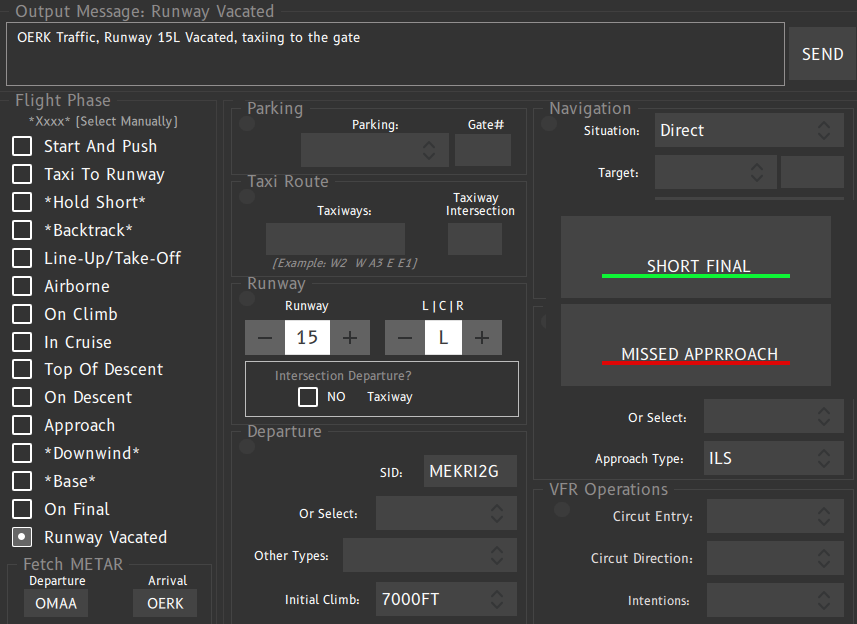
NOTE that there are 2 buttons which automatically transmit predefined messages for quick action:
- Green button Short final : When clicking this message, this will send a message stating that you are on short final and landing immediately. This message is used to prevent any aircraft entering on the runway if there is traffic on holding points.
- Red button Missed Approach : When clicking this message, this will send a message stating that you are making a going around and perform a missed approach.
¶ VFR OPERATIONS
In addition to the main function, you will find 2 VFR optional menus:
- Downwind
- Base
These sections are working through the VFR operation area.
We let you discover these options by yourself. Just select and see the output message before sending.
¶ AUTHOR
- VID 150259 - Creation
- VID 450012 - Update 4 August 2020
¶ COPYRIGHT
- This documentation is copyrighted as part of the intellectual property of the International Virtual Aviation Organisation.
¶ DISCLAIMER
- The content of this documentation is intended for aviation simulation only and must not be used for real aviation operations.