¶ INTRODUCTION
In this document, you will be instructed how to use IvAp (IVAOs’ pilots tool) properly. This is just a short overview of the basics required for the PP exam.
Pay attention that this document is designed using an IvAp version which works only with FS9, FSX or Prepar3d simulators.
For a full explanation and list of all commands and functions, and for any further setup instructions, please refer to the latest IvAp manual.
¶ GENERAL IVAP WINDOWS LAYOUT

In the picture above you can see the pilots’ client after start-up - version 1.9.8.
By clicking on the button next to MAIN>, you will find the main display that is used for several entries and output. By clicking MAIN> again, you are back to the first menu.
The screen you are looking at can be divided into several parts:
- Part which includes the command buttons next to the black screen, 6 each per side. [RED]
- Part which includes the dialog box written in white with black background [YELLOW]
- Part which includes the status LED [BLUE]
- Part which includes transponder information [VIOLET]
- Part which includes the action buttons and online/offline status [GREEN]

¶ STATUS LIGHTS
On the right hand side of the client, four status lights providing information about important factors can be found:
- FP status light: it is red when no flight plan has been sent and will turn grey once the flight plan is sent.
- FS status light: it is green when the connection between IvAp and Flight Simulator is successful and red if it is not.
- MP status light: it is green when the multiplayer connection to FS is successful and red if it is not.
- NET status light: it is green if the connection between IvAp and the internal message broker is successful and red if it is not.

¶ TRANSPONDER
Below the status lights is the transponder section which includes:
- A switch to toggle its status from standby (“STBY” and red light spot) to active (“TX” and green light spot).
- Four digits black window indicating your present squawk code.
- The IDENT button must only be used after ATC has instructed you to do so. This function makes your target flash on the radar of the controller’s radar screen. ATC will instruct a pilot to click that button when using the phrase “SQUAWK IDENT”.
Be aware that when flying, you must set this toggle switch to:
- Position STBY (red light spot) when you are on the apron or on taxiways (taxiing, on gate)
- Position TX (green light spot) when you are on the runway and flying

¶ ACTION BUTTONS AND ONLINE/OFFLINE STATUS
In the bottom right of the IvAp windows, there are three action buttons:
- TCAS button: TCAS stands for Traffic Collision Avoidance System. By clicking on the button, a new small window opens, simulating a TCAS window.
- PUSH BACK button: This tool simulates an aircraft tug. By clicking on the button, a new small window opens showing the pushback tool. Using this tool, the aeroplane can be pushed-back and turned onto the taxiway.
- CONN button: used to connect to or disconnect from the IVAO Network (called IVAN).

Above these three buttons there is a black window that shows the status of the connection in the IVAO Network. There are only two possibilities ONLINE or OFFLINE.
¶ DIALOG BOX LAYOUT AND COMMAND BUTTONS
This display shown is the MAIN page of the IvAp window.

¶ THE UPPER PART
The upper part includes:
- 2 VHF frequencies VHF1 and VHF2
- <ACT> indication which frequency is currently active
- ACARS> button that leads you into another menu (see next chapters)

¶ THE MIDDLE PART
The middle part between the two dashed lines is a log and chat window for several messages, such as:
- Text radio communications from a pilot or an ATC
- controller requests to contact him
- UNICOM message
- Server and Broadcast Messages for all members

All messages displayed in red are private chat messages. They do not originate from any frequency.
¶ THE LOWER PART
The lower part is an input area for text, also called the ‘scratchpad’.
There are many possibilities to use this area:
- Interact on frequency by typing your messages.
- Interact with software by using text commands. These commands are initiated by using a dot “.”, followed by the command letter, then your message

Be aware that your call sign is automatically inserted before your message by IvAp.
Here are the most important and most used commands for the IVAP scratchpad:
- Send a private message: .msg <callsign> <message> or .m <callsign> <message>
- Reply to last private message: .reply <message> or .r <message>
- Open a chat window: .chat <callsign> or .chat
- Resend flight plan: .fpl or .f
- Set frequency on active COM radio: .c <frequency>
- Change transponder code: .x <4 digit squawk code>
- Request METAR of an airport: .wx <ICAOcode> or .w <ICAOcode>
- Request ATIS of an ATC unit: .atis <ATCunit> or .a <ATCunit>
- Show active ATC list: .atc
- Refresh weather: .rw
- Inform all online supervisors: .wallop <message>
- Disable voice (while connected): .novoice
- Enable voice (while connected): .voice
- Switch to receive only-voice (while connected): .recvvoice
¶ RADIO FUNCTIONS
On the MAIN IvAp window, you will find radio communication buttons and relevant feedback:
- There are 2 VHF frequencies. One active and one Stand-by. The active frequency is indicated with the <ACT> active sign.

If you left click on the button with your mouse, you can change the active frequency from VHF1 to VHF2.
If you right click on the button with your mouse, you can change the frequency value using the ATC ONLINE selection window.
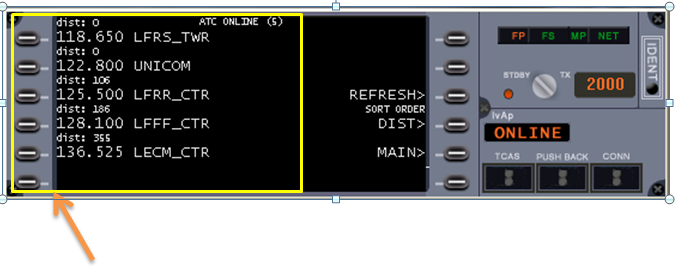
If you left click on the button with your mouse in front of the chosen ATC position and frequency, the frequency is changed automatically in the VHF channel in the MAIN panel.
¶ SUB MENUS ACARS
Definition: ACARS is Aircraft Communication Addressing and Reporting System.
¶ ENTER IN ACARS PAGE

By clicking on the button next to ACARS> in the MAIN screen, a new menu with several options appears:
¶ GET METAR AND TAF INFORMATION
You can obtain your departure and arrival airports’ METAR by clicking on the first or second button next to the corresponding ICAO code of these airports.

Another method is:
- Insert an ICAO airfield code into the scratchpad (example: KJFK)
- Click the proper <REQ button. Then, you will receive a TAF, SHORTTAF or a METAR.
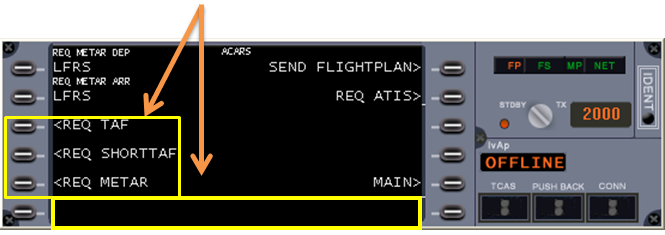
Pay attention that TAF and SHORTTAF are available only at some large airfields.
¶ GET THE ATIS FROM AN ACTIVE ATC
You can get the ATIS from an active ATC position:
- Insert one active ATC position into the scratchpad (example EDDF_TWR)
- Click the REQ ATIS> button

¶ SEND FLIGHT PLAN
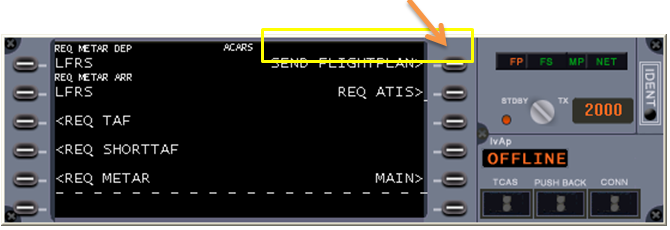
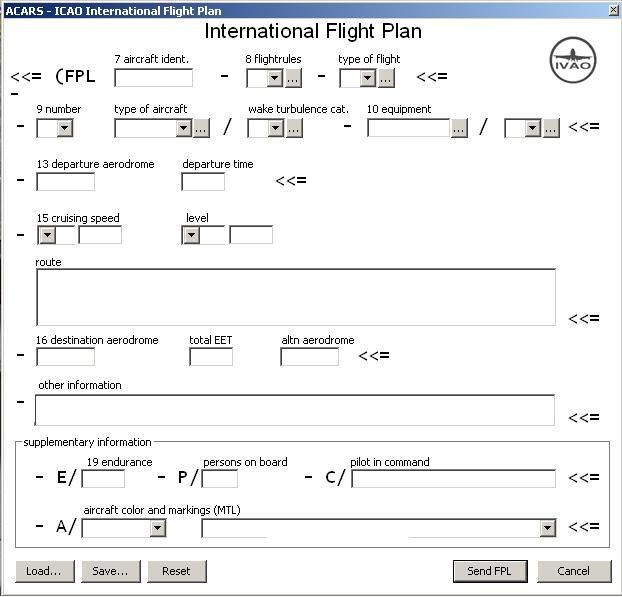
The SEND FLIGHTPLAN> button will open a new window in which the flight plan must be completed.
The figure below shows an empty flight plan to fill (consult the flight plan documentation for further details).
¶ TCAS MODULE
A traffic collision avoidance system or traffic alert and collision avoidance system, both abbreviated as TCAS (pronounced tee-kas), is an aircraft collision avoidance system which monitors the airspace around an aircraft for other aircraft equipped with a corresponding active transponder, independent of air traffic control, and warns pilots of the presence of other transponder-equipped aircraft which may present a threat of mid-air collision.
In IvAp, TCAS can be activated using the TCAS button on the interface

A new window opens and shows a deactivated TCAS with message “TCAS OFF” like the image below. In this window, there are 4 button activation zones where the user can click using the mouse in order to change TCAS parameters highlighted in the picture below with orange rectangles
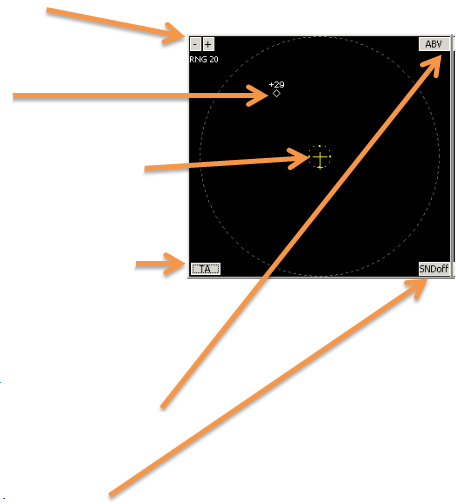
This zone can change the horizontal range of the TCAS. Possible values are: 3, 5, 10, 20 or 40 NM
This representation shows traffic in range. The value is the difference in altitude divided by 100 (+ is above – is below)
The representation of your aircraft position is the yellow symbol in the middle.
This zone can change the state of the TCAS system: STBY=OFF, TA=ON (traffic advisory), RA=ON (resolution advisory)
This zone can change the vertical visibility range of the TCAS. Possible values are: ALL, NORM, BLW, ABV NORM= all traffic from your current altitude ± 2700ft is displayed ALL = all traffic is displayed ABV = all traffic from your current altitude -2700ft to +9000ft is displayed BLW = all traffic from your current altitude -9000ft to +2700ft is displayed
This zone can change the sound STATUS, sound ON or OFF.
¶ PUSH BACK MODULE
In the IvAp interface you can find a simple push-back tool.
In the IvAp window, the Push-back module can be activated using the PUSH-BACK button on the interface

A new window opens and shows:
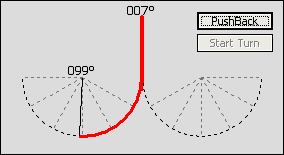
- Click on a position angle on one of the half circles shown.
- To start the push back operation, release the brakes and click on the « Push back » button.
- Pushback now starts.
- If you want to start the turn, you must click on the « start turn » button.
- Push back will end when you click on « pushback » button or you apply the brakes.
¶ SEE ALSO
- None
¶ REFERENCE
- None
¶ AUTHOR
- VID 150259 - Creation
- VID 256272 - Wiki Integration
- VID 346148 - Wiki Migration
¶ COPYRIGHT
- This documentation is copyrighted as part of the intellectual property of the International Virtual Aviation Organisation.
¶ DISCLAIMER
- The content of this documentation is intended for aviation simulation only and must not be used for real aviation operations.