¶ Initial situation and setup
¶ Aircraft preparation
During the approach phase of your flight, you must configure your aircraft for the ILS approach.
- Take the ILS frequency from charts : configure your radio navigation receiver NAV1
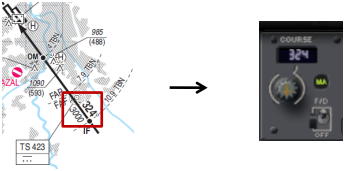
- Take the ILS course and interception altitude of the localizer from charts : configure the course and configure your descent to this altitude

¶ Aircraft state
Before joining the localizer, you must check the following points:
1. Aircraft speed shall be reduced to between 180KT and 220KT.
2. Aircraft descent altitude shall be set to the interception altitude of the localizer published on charts.
3. Aircraft flaps are set to 5° position.
4. If you want to perform an automatic ILS approach, the APP button shall be activated
5. Set auto brake to adequate value
When performing an ILS approach, you must establish the localizer before the glide path.
You can consider being established when the indicator is staying at the central position ± 1 bullet.
If you are far from the localizer path and glide path, all ILS indicators are set to maximum deviation and remain at this position (like the image hereunder). If you are close to the path, the indicator shall move to the central position.
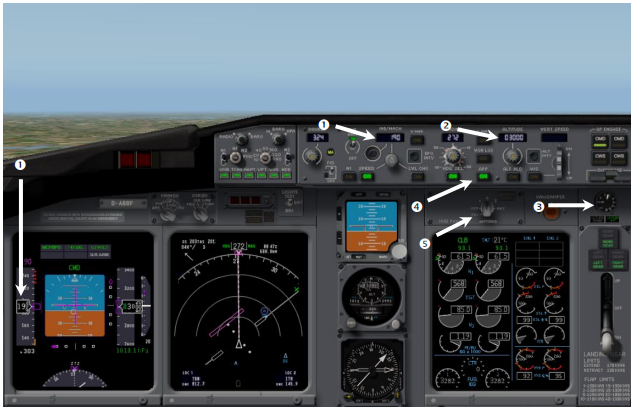
When the localizer indicator is on the left it means that the localizer path is on the aircraft's left, or the aircraft is on the right of the localizer path.
An ILS approach can be performed manually by the pilot. The use of autopilot is not mandatory
¶ Flying the ILS
¶ Establishing on the localizer
When the localizer indicator is moving to the central position, you must turn toward the runway.
You must adjust your heading in order to keep the localizer indicator near the centre position.
By doing so, you will keep the runway alignment until touchdown.
In the picture hereunder, you can notice:
- The localizer indicator is near the centre bar (red). You are established on the localizer.
- The glide indicator is still at the maximum deviation (green). You are still below the glide path.
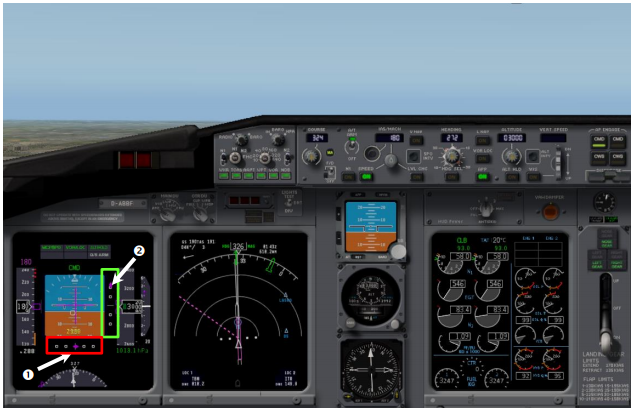
When the glide indicator is on the top it means that the glide path is above the aircraft or the aircraft is below the glide path.
During normal ILS approach, you must always intercept and establish on the localizer when the glide path indicator is on top or above the middle (like the image above n°2).
The spoilers can be armed at this stage.
The runway can be seen now (depends on the weather, distance)
¶ Establishing on the glide path
When the glide path indicator is moving to the central position, you must initiate your descent:
1. Reduce the power and speed down to 160kt
2. Set the flaps to 15° position
3. Set gear leveller to down position. And check that the gear feedback indicators are green
4. Maintain localizer and glide path indicator near the centre position.
5. Check your vertical speed indicator. The approximate value can be calculated for 3-degree descent angle: ground speed x 5. (example: 120kt x 5 = 600ft/min).
You must adjust your pitch and power in order to keep the glide path indicator near the centre position.
By doing so, you will maintain a constant descent until the short final.
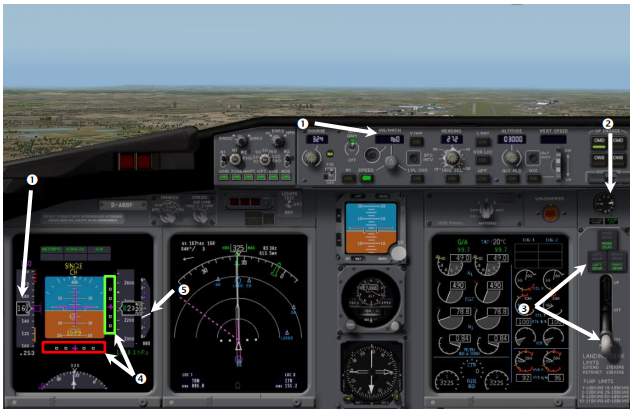
When localizer and glide path indicator are located near the middle of the indicator, you can consider the ILS being established.
¶ Check point at the outer marker
When stabilized on the ILS, it is time to check your approach progress:
- Locate on your charts the intermediate altitude check mainly located at the outer marker (OM on chart).
- Check the altitude when reaching this point (it can be a DME distance or navigation aid reference)
- Set final approach speed and flaps. Here set 140kt and select flaps 30° to 40°.
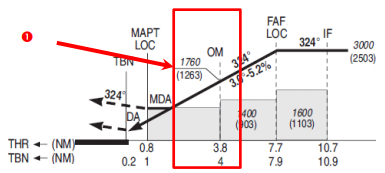
In the example, the altitude to check is 1760ft at 4NM DME of TBN radio navigation aid.
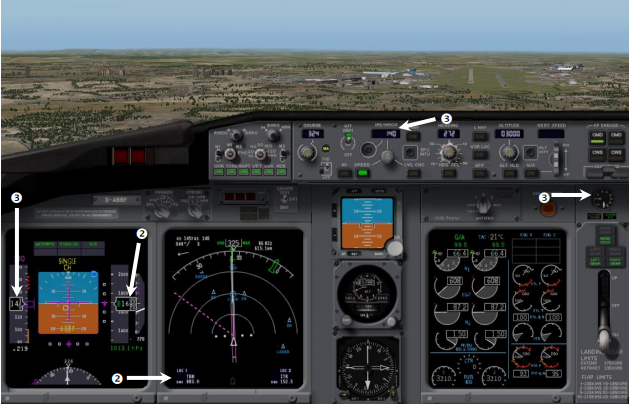
When the descent rate is stabilized, the approach speed should be reduced to the final approach speed.
¶ Approaching decision altitude
When you will be on short final, it is time to decide to land or go around, after the Missed Approach Point.
- Check on your charts the decision altitude (on chart you will find mainly ILS CAT I decision altitude)
- Program your go around altitude on the autopilot panel.
- Check that the aircraft speed is stabilized at the target speed and disable auto throttle for final landing
- When reaching decision altitude, you need to decide to land or go around. At this time, you must disconnect the autopilot if it is still engaged
At decision altitude, if you see the runway or 3 consecutive approach lights on the ground, you can continue the ILS approach, if you don't have this visual reference, you must go around.
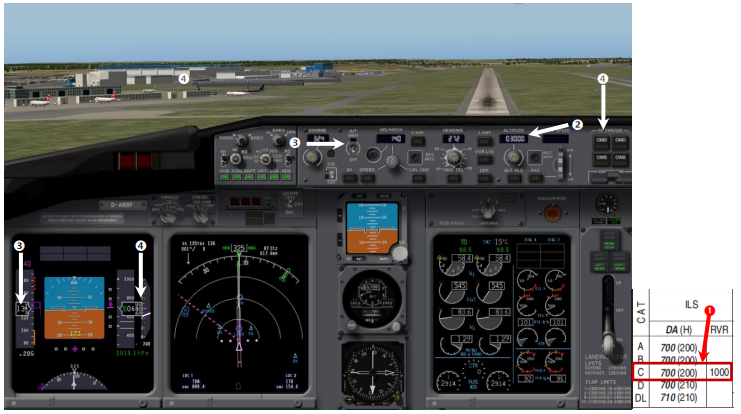
The aircraft must be stabilized on final in landing configuration at least 1000 ft above the ground. The pilot in command shall not hesitate to go around if his aircraft is not stabilized on final, or the approach speed is excessive.
- None
- VID 208011 - Creation in French for IVAO France
- VID 150259 - Translation and Adaption to HQ documentation standards
- VID 200696 - Update
- VID 497664 & 496402 - Wiki.js integration