¶ Introduction
This documentation deals with the various exercises that can be performed as a VFR flight, typically, in a light single or twin engine aircraft.
These exercises should be mastered by any pilot as basics to flying skills.
We will study three groups of exercises:
- Runway options
- Unusual positions
- Simulated engine-out manoeuvres
¶ Runway options
¶ Low pass
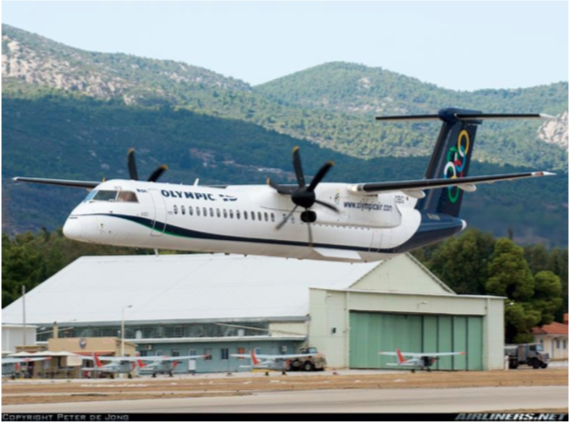
At the end of the approach, the goal is to level-off the descent and to fly steady at a few tens of feet above the runway. The exercise should end passing the end of the runway, performing a go-around.
This will develop your ability to maintain your airplane leveled to a precise altitude in a specific configuration, affected by wind along an axis.
This exercise can be repeated in many different configurations (flaps setting, landing gear extension, targeted speed...)
¶ Touch-and-go
Instead of performing a full stop landing, the goal is to land, and as soon as the aircraft is under control and on the runway centerline, in takeoff configuration, to perform a takeoff without losing too much speed.
In case of settings different than for takeoff, do not forget to set your aircraft in the appropriate configuration. The most obvious parameter is flaps, with a common landing setting between 30° and 40°, while takeoff requires in general between 0° and 10°.
¶ Stop-and-go
Very similar to the touch-and-go, except that before taking-off again, the aircraft must be brought to a full stop. This particular exercise is particularly efficient to work out your landing distance.
In case of settings different than for takeoff, do not forget to set your aircraft in the appropriate configuration. The most obvious parameter is flaps, with a common landing setting between 30° and 40°, while takeoff requires in general between 0° and 10°.
It is critical to take into consideration the runway length when performing this exercise.
¶ Unusual positions
¶ Stall
An aircraft is stalling when there is a sudden decrease in the lift generated by an aerofoil.
Therefore, as the lift is function of speed and angle of attack, stall may occur when:
- airspeed is too low; each aircraft has conf-specific stall speeds determined by the manufacturer.
- angle of attack is too high; pitch and roll alter angle of attack of an airfoil.
Dynamic stall is inducted by too high load factor (abrupt attitude change).
Hence, stall is a dangerous phenomenon happening at excessive pitch or bank angle, or when flying too slowly. Recognition includes a continuous descent despite a high nose-up attitude, buffet, poor roll control.
A simple way to experiment stall is to fly leveled at a constant altitude. Then slowly throttle down the aircraft until setting the engine to idle.
Your goal here is to not let that aircraft descend. Keep your altitude. By doing so, you will see a decrease in airspeed, thus, to maintain your altitude, you will need to increase your angle of attack to maintain the generated lift constant.
As the airspeed continues to decrease, you will finally reach maximum elevator deflection, and despite your efforts, your aircraft will become agitated (buffet), with poor roll control and you will descend continuously. At this precise moment, the aircraft is stalling.
When a pilot suspects a stall, he must apply immediate recovery action which consists of:
- seeking nose-down attitude by pitching down.
- applying full available power/thrust.
¶ Spin
A spin is triggered by an asymmetrical stall.
Contrary to a typical stall where both wings have stalled, a spinning aircraft is one of which only one wing has stalled.
Therefore, a spin is an even more dangerous phenomenon and should be dealt with carefully. Recognition is stall symptoms associated with a continuously yawing aircraft after an abrupt change in bank.
Numerous aircraft have operating manuals prohibiting seeking spin in reality. However, seeking to experience a spin can be done by banking whilst seeking stall with the above method.
When a pilot experiences a spin, he must apply immediate recovery action which consists of:
- Idle engine
- seeking for 0° bank angle (leveled wing)
- full deflection of rudder toward the opposite direction of the apparent yawing
THEN, apply standard stall recovery:
- seeking nose-down attitude by pitching down.
- applying full available power/thrust.
Note that Microsoft Flight Simulator aerodynamics do not reproduce well spin behaviour.
¶ Spiral dive
Spiral dive is a natural phenomenon resulting from the latent instability of the aircraft. When let free, an aircraft will have a tendency to roll (resulting from various forces acting). This induced roll will lead to an increasing pitch down attitude while bank angle increases excessively, thence leading to an increase of the airspeed.
Therefore, spiral dive is a dangerous phenomenon resulting from the natural unstable tendency of the aircraft. Due to the increase of airspeed, the risk is to exceed VNE, thus leading to high structural loads.
When flying VMC, as the pilot will focus outside, flying its airplane looking at the natural horizon, he will naturally counter-act this instability. To experience a spiral dive, fly your plane in a steady leveled attitude. Then, without correcting pitch to maintain altitude, increase bank angle between 10° and 20° and raise your hands, letting the plane flying freely. You should see the aircraft banking with an increasing pitch down attitude while the airspeed is increasing.
When a pilot identifies a spiral dive, he must apply immediate recovery action which consists of:
- throttle down the engine to idle state without delay
- level the wing
- smoothly correct the pitch attitude of the aircraft toward a nose-up attitude to resorb airspeed
- when airspeed indication is below VNO, adjust throttle and pitch settings.
¶ Glide angle
¶ Description
When an airplane loses its engine(s), contrary to the popular belief of a falling piece of metal, it will actually glide. Since the lift generated by an airfoil varies only because of the speed, as long as an airplane keeps its speed, it will fly. However, since it is function of the squared speed, the lift will be maximum for only one airspeed.
Therefore, at a constant airspeed specific for each aircraft, an airplane will glide the farthest. Therefore, it can be considered a gliding path/angle. This glide angle can be seen by the pilot in the cockpit to estimate which field can be reached in case of a sudden engine failure on a single engine aircraft for example.
This airspeed is independent of the mass.
¶ Examples
¶ Piper PA28
- Glide ratio: 8
- Glide speed: 76kts
- Glide angle: 7.5°
- Equivalent altitude-distance: 750 ft <-> 1 NM
¶ Cessna 172
- Glide ratio: 9
- Glide speed: 68kts
- Glide angle: 7°
- Equivalent altitude-distance: 700 ft <-> 1 NM
¶ TB20 Trinidad -- glide angle visualization
Below are the reference points for the glide angle in a TB20, everything inside the red line is reachable by gliding.

References are based on fuel cap and engine inspection flap.
Note that these references are seen from pilot's eyes, and may vary with height.
¶ Determination and visualization
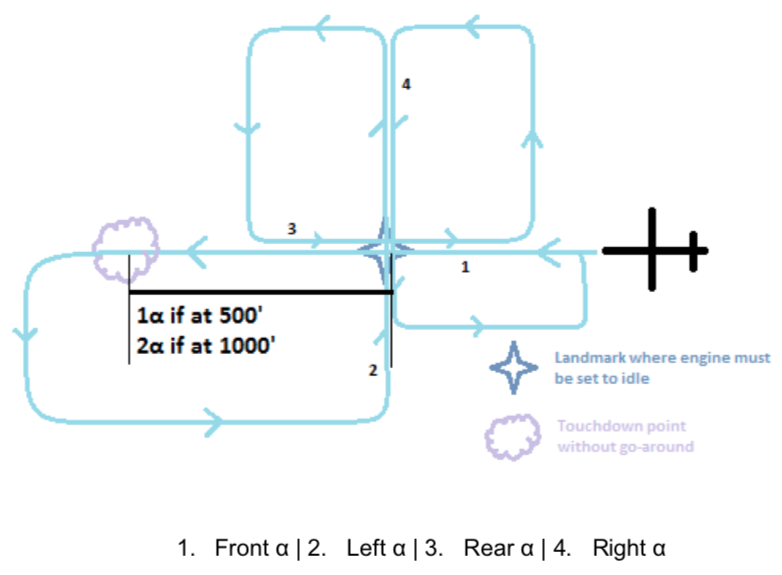
Simulated engine-out manoeuvres require you to determine the glide angle (noted α). This glide angle is the maximum distance you can travel when gliding.
1α is the absolute maximum reachable distance. 2α is a distance you can consider 100% reachable.
Fly at 1.3 x Vstall in approach configuration + 5kts; at 500ft AGL.
Since the glide angle is only defined by ratio Lift/Drag, one and only one airspeed value allows for the maximum glide distance. Therefore, pitch must be precisely adjusted to fly at a specific airspeed. Flying too fast or too slow will deteriorate the glide distance.
Take a landmark and you will simulate engine failure when passing over it. Make a quick reduction toward your targeted speed, to be very precise. Remember that in this case, pitch controls airspeed.
While descending, you have to find the touchdown zone: it will be the area which will not be apparently moving. You will need to remember that area. You can now go around and reach the first landmark at 500ft. Fly over it in all directions so you can visualize 1α. Take visual references: on the wing, on the seat or on the panel.
Do the same at 1000ft so you'll see the 2α and their references.
Wherever the engine failure happens, the goal is always the same: to rejoin a studied situation. Whatever is your landing site, try to position the aircraft referring to a known technique.
¶ Simulated engine-out manoeuvres
¶ Front landing site
When landing site is in front of us, the goal is to adjust speed to keep the touchdown zone within 1α and 2α
When practicing, engine should be set to idle when passing 2α to the aimed touchdown zone (lightning).

¶ Abeam landing site
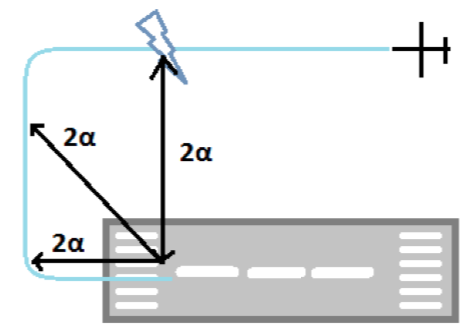
Being positioned along the landing site, try to fly the aircraft to be abeam the aimed touchdown zone, seeing it under 2α.
When practicing, engine should be set to idle when passing abeam the aimed touchdown zone (lightning).
The goal is then to keep the aimed touchdown zone under 2α, through a rectangular circuit pattern Adjust position of the aircraft accordingly by converging or diverging in regard to the initial attended flightpath.
¶ Perpendicular landing site
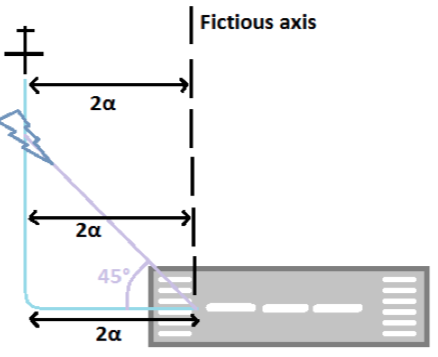
Being positioned alongside a fictious axis (as depicted) seen under 2α, try to fly the aircraft to rejoin the last part of the flightpath of the previous case. Keypoint is critical and is a 45° angle from touchdown zone.
When practicing, engine should be set to idle when passing abeam 45° radial from the aimed touchdown zone. Flying at 90° from the landing site axis, adjust position so as you can maintain 2α.
¶ Overhead landing site
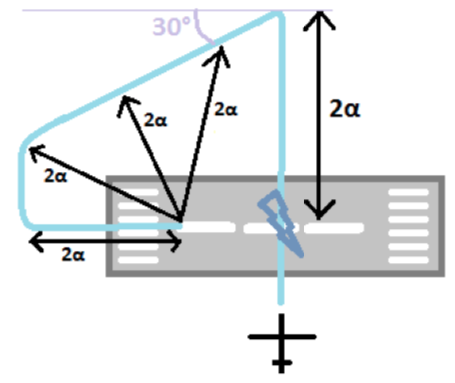
Being positioned overhead the landing site, fly the aircraft perpendicularly to the landing axis. Then always fly as to maintain 2α during the entire manoeuvre.
When practicing, engine should be set to idle when passing overhead the aimed touchdown zone axis (lightning).
Since 2α will be reached with a subsequent turn > 90° to maintain 2α, a 30° convergence turn should be made to stay within the 2α limit.
¶ Conclusion
These exercises represent the basics that any good pilot should master when flying any typical single or twin-engine airplane. Training on a regular basis allows maintaining a precise flying skill.
This list is not complete. In particular when it comes to simulated engine failure manoeuvres. We made the choice to describe those which are taught in flying schools aimed for professional licensing.
These exercises are tasks required during the real examination for PP and CP license issue.
- None
- None
- VID 200696 - Creation
- VID 450012 - Wiki Integration
- VID 496402 - Wiki.js integration