¶ Using the official sectorfiles
So that you can control in IVAO you'll need to download all the data Aurora, the controller client, needs in order to show you the UK and/or Ireland.
We call these sectorfiles. In this guide we'll show you how to use the official IVAO XU community sectorfile.
¶ 1.Downloading and installing a sectorfile
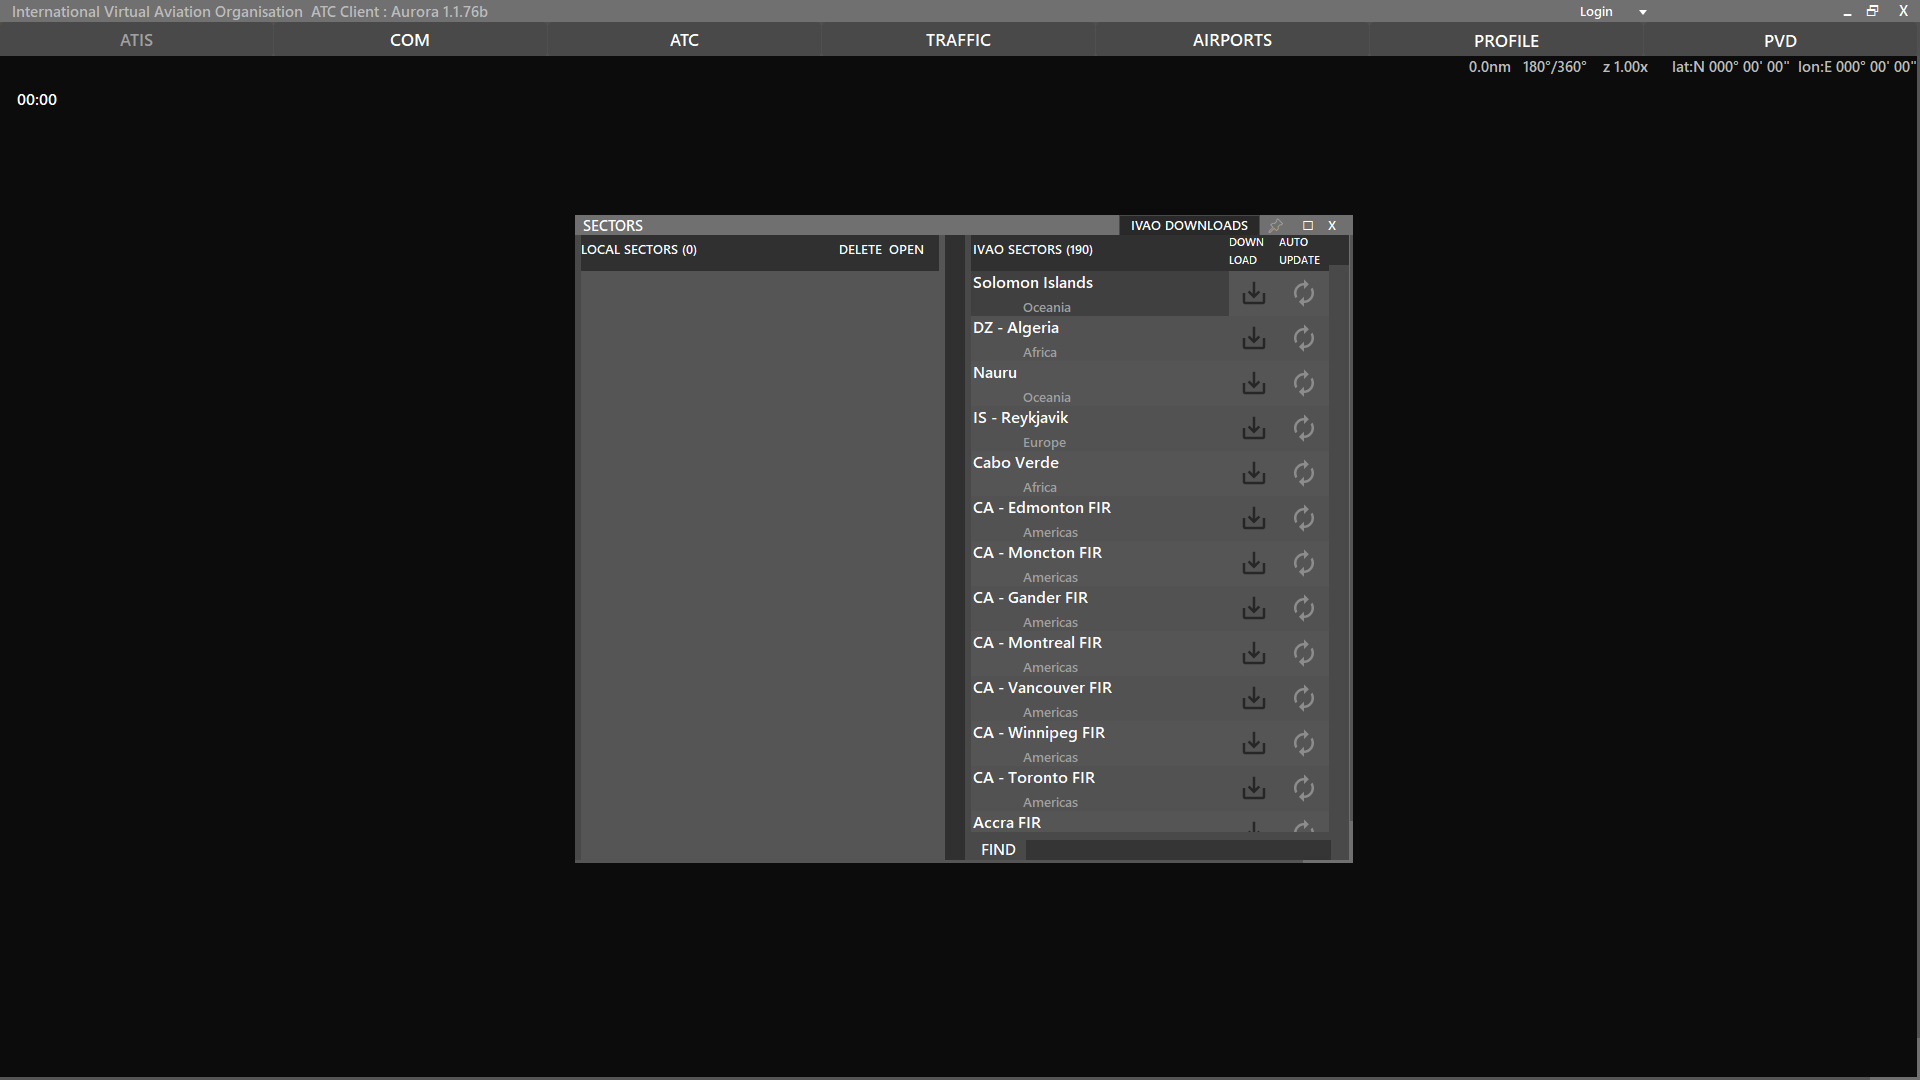
The first time you open up Aurora, the screen where you can find all of the sector files will welcome you. If you have previously used Aurora and have a sectorfile loaded, go to PVD and then SECTOR.
Here, first column on the left shows available sector files downloaded on your computer and on the right you can find all the sector files in the IVAO Download Server. You can press IVAO DOWNLOADS to hide/unhide the download column.

In the bottom right you can find a search box, use this to search for the sectorfiles for the division by typing GB for the United Kingdom's sectorfile and IE for the Irish sectorfile.
You can also click the auto-update button so you always have the latest file. Once they're downloaded, they will show in the left column,
The current sectorfiles take the format egxx and eixx, if you have any sectorfiles that start EG_ or EI_ you should delete these now. Clicking the folder icon will open the sectorfile.
For more information on using Aurora, consult the official IVAO software manual.
¶ 2.Choosing the right sectorfile
Depending on where you want to control, you'll need to open the correct sectorfile.
- For airports in England, use egxx
- For airports in Scotland, use egxx
- For airports in Wales, use egxx
- For airports in Northern Ireland, use egxx
- For airports in the Channel Islands, use egxx
- For airports in Eire, use eisn
- For airports in Gibraltar, use the Spanish divisional sectorfile. Please note that the XU division does not take responsibility for this sectorfile so is unable to help with any queries.
When you choose your sectorfile, please wait a few moments for the loading process to complete. This is a two step process, there will be a loading window first and once that's gone Aurora will render all the parts of the sectorfile. The last thing it does is render the ground layouts at airports.
¶ 3.Choosing the right colourscheme
Once you've opened the correct sectorfile, you'll also need to load the correct colourscheme for the position you want to open. In time, we will provide colourschemes for each ATC position, but for now please use the following rule of thumb:
- For aerodrome (DEL, GND and TWR) control, use NOVA 9000
- For approach control outside the London TMA, use NOVA 9000
- For approach control within the London TMA, use NODE-S
- For approach control in Eire, use NOVA 9000
- For area control within the London TMA, use NODE-S
- For area control outside the London TMA, use iFACTS
- For area control in Eire, use NOVA 9000
¶ 4.Downloading and installing colours
All XU Division colour schemes can be downloaded below.
| Colour schemes | Download here |
|---|
Place the downloaded colourscheme file into your Aurora colour schemes folder.
To load the colourscheme go to to PVD menu, then COLOUR and click LOAD at the bottom of the window that opens.
¶ 2. Setting up to control
¶ Configuring Aurora
Many members try to control with everything turned on, so they have an extremely cluttered radar display which is overwhelming and often leads to issues when controlling. Getting set up before you connect is going to make things much easier for you, especially if you're connecting to a busy position. Here's some things to check:
- Right click in the middle of the display and confirm both PREF BAR and MENU BAR are selected (white).
- Open TRAFFIC and COM by selecting them at the top of the screen. These are the two windows you'll use the most when controlling.
- Open the AIRPORTS window and deselect the MRVA and VFR points for every airport other than the one(s) you're controlling. Do this by clicking the white eye symbols so they go grey. This is a slow process, but really important.
Once that's done you can start to tweak Aurora's settings! Go to PVD then SETTINGS, then make the changes below. Not everything needs changing, so here's the most important ones to consider.
¶ Radar
- PSR Range (Horizontal) and SSR Range (Horizontal) should be set to a distance that makes sense for your position. For example as a Tower controller, do you need to see more than 20 nautical miles from your airport?
- PSR Range (Vertical TOP) and SSR Range (Vertical TOP) again should be set to an altitude that makes sense. For Tower, we recommend 4000ft. For Ground, 1000ft is high enough.
- PSR Range (Vertical FLOOR) and SSR Range (Vertical FLOOR) should be set to -200ft. Yes, that's minus. And no, we don't know why either, just trust us though!
- Traffic refresh rate set to 2.0 seconds otherwise you may see aircraft moving forwards and then back again.
- On Screen STRIP should be set to LEFT and then NO in the two boxes. We don't use the on screen strip as part of the label.
- Autohide Route set to Yes.
- Ignore DUPE set to No.
¶ Labels
- Label type set to Static. Custom labels will be provided for each position soon.
- State color set to Background.
- Backgr. color set to No.
- Backgr. filled set to Yes.
- Wake Turbulence colour assumed set to No.
- OS Strip background filled set to No.
- Lock type set to Auto.
- Altitude ALERT set to Yes. For area controllers please note that tagging an aircraft with a new level to descend “when ready” will cause an altitude alert, but this is a tradeoff for aircraft climbing/descending without clearance or busting their level.
- S-mode equipment ground set to Yes.
- S-mode equipment airborne set to No.
¶ Com
- Auto accept transfer set to No.
- Clear labels on Release set to Yes.
- Release message set to No Voice.
- Transfer message set to No Voice.
- Transfer Accept message set to No.
¶ VHF Radio
- Radio: GAREX
¶ SQK
- VFR type in 7000.
- SQK from IVAO server set to Yes.
¶ Other
- Save profile on exit set to Yes.
- Focus combox set to No.
¶ Where to find features
Due to limitations of Aurora (remember, it has to be usable by divisions worldwide who all have different radar systems and functionality!) there are features with names you might not expect, or in places that don't make sense. For each of the below, left clicking the button will turn it on (white) or off (grey), and SHIFT and clicking will bring up a menu allow you to show or hide certain things.
- LS: Airport CTRs and CTAs
- HS: Controlled airspace boundaries
- ACC: Area control sector boundaries and Radar buffer zones.
- VFR: Visual reporting points, can be turned on/off per airport in the AIRPORTS window
- VFRR: VFR routes such as entry/exit lanes and London's helicopter routes
- MRV: Radar Maneuvering Area can be turned on/off per airport in the AIRPORTS window
In the AIRPORTS window you'll also see 00DB and 00IC, these allow you to turn labels on/off for the base of controlled airspace (DB = designated base) or intention codes (IC) around the FIR boundary.
¶ Delivery (DEL) and Ground (GND) specific features
Stand numbers, taxiway centrelines and labels, and holding point stop-bars and labels have been added for all major airports across the FIRs.
You can enable these by turning on the GTS, TXC, TXI and TXL.
¶ Tower (TWR) specific features
We recommend using the same features and view as DEL and GND, and using an inset that is more zoomed out to see your ATZ and the active approach. This will ensure you can maintain situational awareness throughout your session.
¶ Approach (APP) specific features
To be added
¶ Area (CTR) specific features
To be added
¶ 3. Improving the sectorfile
The IVAO United Kingdom and Ireland MCD's sectorfiles are community driven and open source, so anyone can contribute fixes, changes or improvements.
¶ How to use GitHub
If you've never heard of it before GitHub is an online platform that allows developers to update code, control updates and allow multiple people to work on the same files at the same time. This is great for us as it means we can have lots of people working together without needing to worry about overwriting each others' updates! Here's a few steps to get involved.
- If you don't have one already, make a GitHub account. It's the first step and the most important! Please select a username that isn't rude or obscene.
- Once you've got an account visit IVAO XU on GitHub and take a look at either the EG or EI sectorfiles.
- As well as the sectorfile data (the Code tab) you'll see everything that still needs to be done, all the bugs and problems, and new features in the Issues tab. This is where you should head.
- Once you're in the Issues tab look for the ‘First Timer Fix’ next to some of the issues listed. These are the easier to fix ones and great if you've never worked with GitHub or the sectorfile format before.
- Find something that takes your fancy and leave a reply asking for it to be assigned to you.
- If you'd like to report a problem, you can create a new issue and either fix it yourself - or ask us to fix it for you.
Now you've got something to work on you'll need the tools to make it happen! Download GitHub Desktop and Visual Studio Code.
¶ Making a copy of the sectorfile so you can make changes
We call this “forking”. Put simply, it's making a copy of the sectorfile for your own use so you can make changes to it before giving it back to us to include in the main file.
These steps can look quite daunting but don't let them put you off, it's actually a fairly simple process that takes only a couple of minutes to do!
- Go to IVAO XU on GitHub and open either the EG or EI sectorfile repository.
- In the top right you'll find a button that says Fork, click that. The page will reload and you'll see that there's now a copy of the sectorfile in your account.
- Open GitHub Desktop and in the top left click “Current Repository” and then under your username, open the sectorfile you just forked. Once that's done ensure “Current Branch” is set to 'master'.
- Click “Fetch Origin” and wait for it to download all your files. Then, back to “Current Branch” and click New Branch. Name your new branch with the issue number and short description of what you're doing. For example #1 Changed coordinates of GEO file to decimal format
- Once you've done this and made your changes to your files in Visual Studio Code, save your changes and in GitHub Desktop you'll see the changed files listed - simple!
- In the bottom left you'll see a box with asking you to commit. Commit! This just means you're saying “yes, I want to include these files now please”. You can also take the opportunity to provide a short description of the work you've done if you like (we recommend doing so, so others know as well!).
- Click Publish Branch in the bar at the top to send your changes back to your forked repository ready for inclusion in the official community sectorfile.
You can follow these steps as many times as you want for as many different issues, fixes, or improvements as you want to contribute to. There's no limit at all!
¶ Including your changes in the official community sectorfile
Once you've published your changes in GitHub Desktop you'll be able to create a “pull request”. Again, this term simply means you're asking IVAO XU to pull your changes back to the official community sectorfile for inclusion.
- Clicking “Create Pull Request” will open the GitHub website and the “Create a pull request” form.
- Confirm that the branch in the base: drop-down menu is the branch where you want to merge your changes. This is 99% of the time going to be master.
- Confirm that the branch in the compare: drop-down menu is the topic branch where you made your changes, in our example is #1 Changed coordinates of GEO file to decimal format
- Add a title and description for your pull request, keep it meaningful so the team know what you've changed and why it should be included.
- To create a pull request that is ready for review, click Create Pull Request. Then, all you need to do is sit back and wait, in the knowledge that you've helped hundreds of other controllers on IVAO by improving the sectorfile!
¶ Creating new aerodrome layouts
Aerodrome layouts, surface movement radars, ground layouts, or airport layouts. They all refer to the same thing; the ability to see the ground layout of the aerodrome within Aurora.
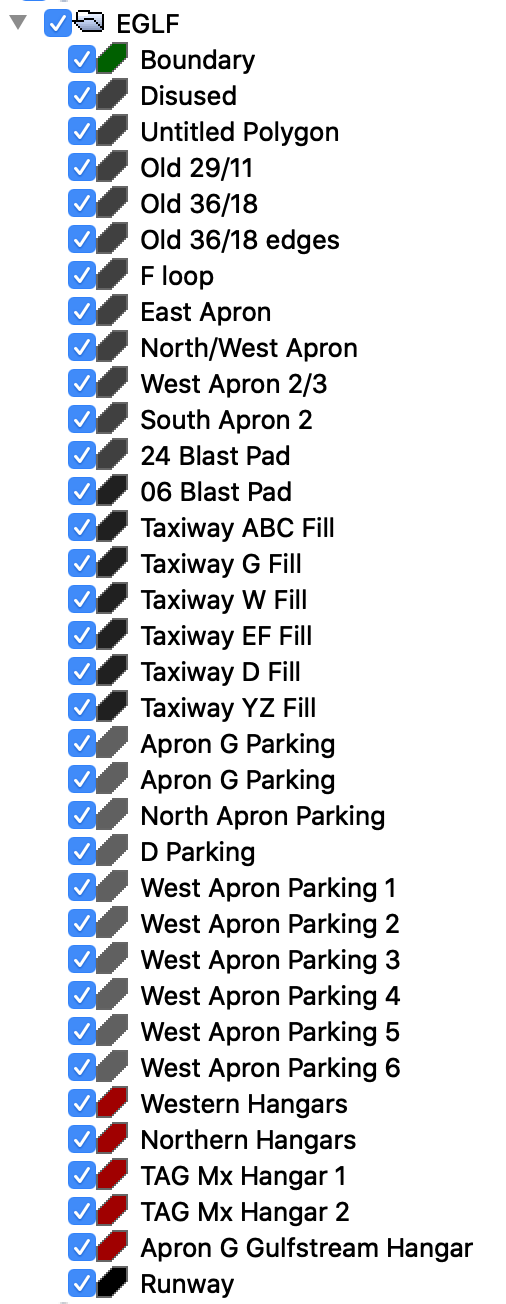
Creating new layouts is an involved process but only needs one piece of additional software; Google Earth (Pro/desktop version). It is important when you're creating ground layouts to create multiple layers for each element; boundary, runways, taxiways, aprons, parking positions and buildings. Farnborough, for example, has a large number of layers:

These layers make it easier for the later stages of the conversion into Aurora format.
- In Google Earth, find and zoom in on the relevant aerodrome.
- In the left-hand pane, right click “My Places”, go to Add and then Folder. Use the airfield ICAO. This means all your layers will be grouped together.
- Use the Add Polygon tool to draw round the aerodrome boundary.

- Repeat the process for each layer; runways, taxiways, aprons, parking positions and buildings.
- For taxiway markings, use Add Path in the same way. Multiple short paths work better than fewer long ones. Make sure you zoom right in to make sure intersections overlap nicely!

- As you add layers you may find that you need to hide other layers to see the map again, this is not a problem. They may be turned on and off as required until you are happy that you've completed the layout.
- Once you've completed the layout, right click on the folder you created earlier and click “Save Place As”. Choose the KML format.
- Add this KML file to the Github repository in the airfield-kml and create a pull request. A member of the IVAO XU team will convert it to the Aurora format as soon as possible.
¶ Rules and licenses
Anyone can contribute to the repositories on GitHub. By contributing you agree that the ownership of any alteration(s) and/or addition(s) you make are transferred to IVAO United Kingdom & Ireland MCD in its entirety and cannot be recalled.